

Hey there! If you’re wondering how to remove a Vivint doorbell, I’ve got you covered. I’ve been tinkering with smart home gadgets for years, and taking down a Vivint doorbell is a breeze once you know the steps.
Trust me, it’s simpler than it sounds. In this quick guide, I’ll share my hands-on expertise on the query “How to remove Vivint doorbell?” and walk you through the process with easy-to-follow instructions.
So, if you’re ready to bid farewell to your Vivint doorbell, let’s dive in together. You’ll have it uninstalled in no time, and I’m here to make sure it’s a smooth experience for you.
Read more: Vivint Home Security System Review
Table of Contents
How to Remove Vivint Outdoor Camera Pro?
Introducing my firsthand guide on removing the Vivint Outdoor Camera Pro. As someone deeply entrenched in the world of smart home technology, I’ve encountered my fair share of challenges. Taking down a Vivint Outdoor Camera Pro, however, is a task I’ve mastered. Follow my expertise, and let’s get this done seamlessly.
1. Gather Your Tools
Before diving into the removal process, ensure you have the necessary tools at hand. I’ll guide you through the essential equipment required for a hassle-free uninstallation.
2. Power Down the Camera
To ensure a safe removal, it’s crucial to cut off the power supply to the Vivint Outdoor Camera Pro. I’ll walk you through the steps to safely power down the device, minimizing any potential risks.
3. Detach the Mounting Bracket
Learn the intricacies of removing the camera from its mounting bracket. I’ll provide step-by-step instructions on detaching the Vivint Outdoor Camera Pro with precision, avoiding any accidental damage.
4. Disconnect Cables Safely
Understanding the camera’s wiring is key to a smooth removal. I’ll guide you through the process of disconnecting cables without causing any harm to the camera or your home’s electrical system.
5. Troubleshooting Tips
Explore common challenges users may face during the removal process. I’ll share troubleshooting tips to overcome potential hurdles, ensuring you can confidently and successfully uninstall your Vivint Outdoor Camera Pro.
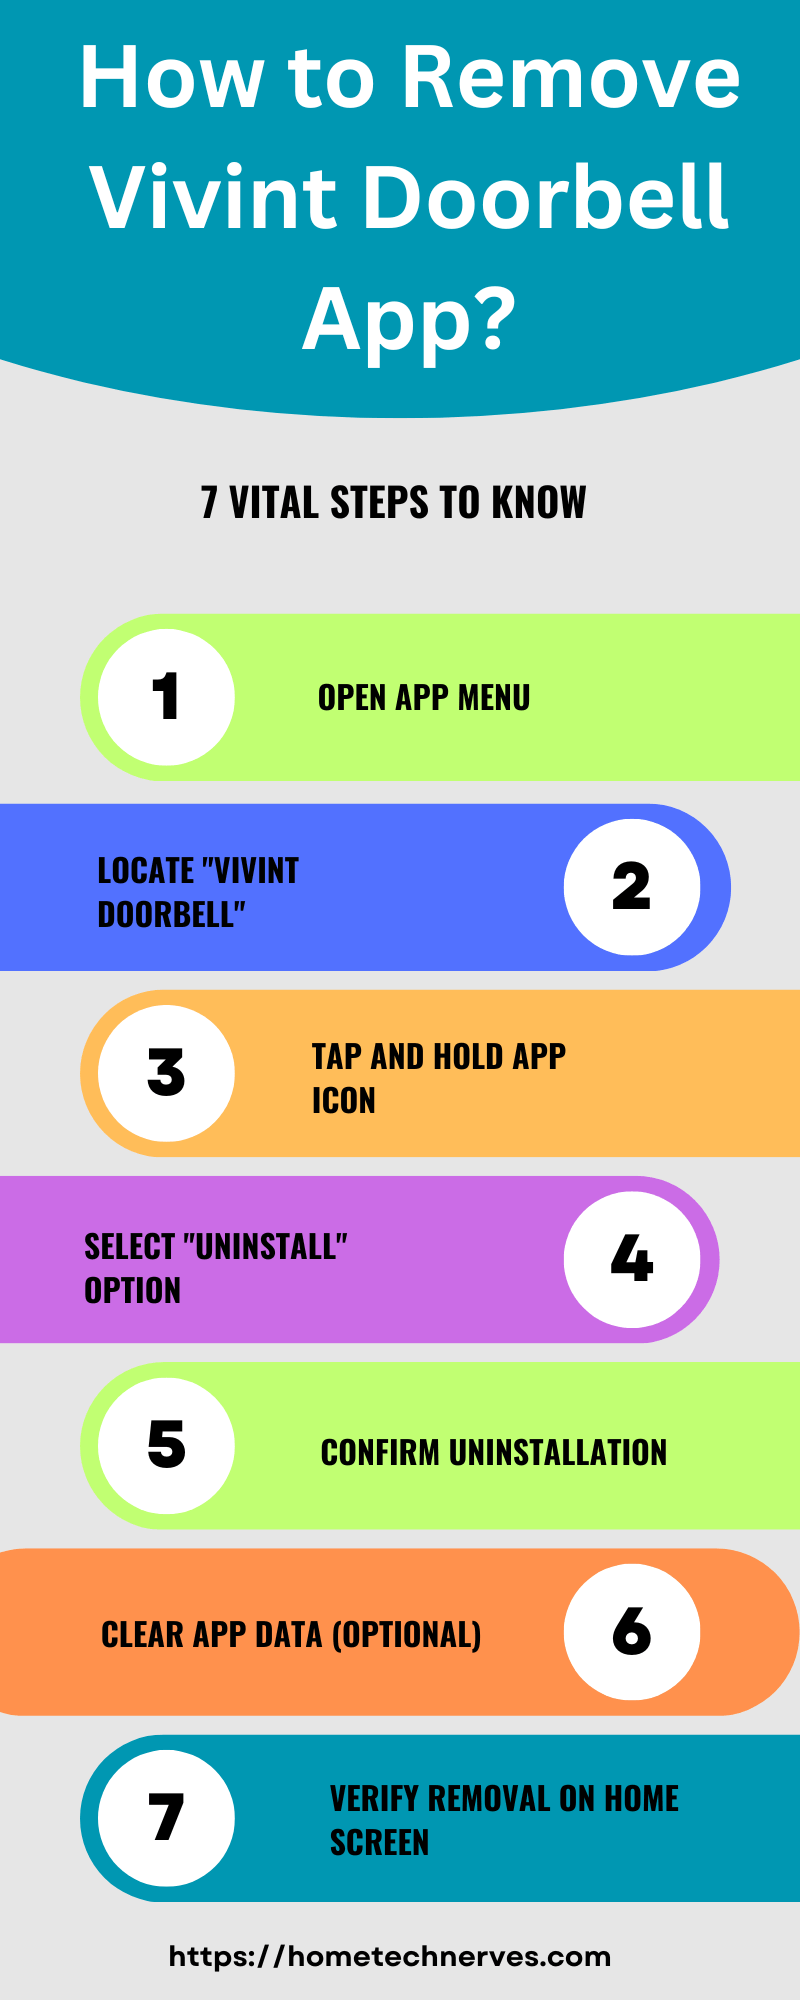
How to Remove Vivint Doorbell App?
Embarking on the journey to remove the Vivint Doorbell app? Let me guide you through the process with ease. As someone deeply immersed in smart home tech, I’ve streamlined the steps for a seamless uninstallation.
- Access Your App Settings: Open your device’s settings, navigate to the “Applications” or “Apps” section, and locate the Vivint Doorbell app.
- Select Uninstall: Once in the app settings, tap on “Uninstall” for the Vivint Doorbell app. Confirm the action if prompted.
- Clear App Data (Optional): For a thorough removal, consider clearing app data. In the app settings, select “Clear Data” to erase any residual information.
- Remove App Permissions: Head to the app permissions section and revoke any access granted to the Vivint Doorbell app, enhancing your privacy.
- Check for Updates: Ensure a clean uninstall by updating the app to the latest version before removal. This step helps prevent any potential glitches during the process.
How to Replace Vivint Doorbell Camera Battery?
Ready to swap out the battery on your Vivint Doorbell Camera? I’ve got you covered with a quick and straightforward guide. As a seasoned tech enthusiast, I’ll walk you through the essential steps for a smooth battery replacement.
- Locate Battery Compartment: Find the battery compartment on your Vivint Doorbell Camera. It’s usually situated beneath the camera, concealed for a sleek design.
- Remove Old Battery: Carefully take out the old battery from its housing. Ensure the camera is turned off to guarantee a safe and efficient replacement.
- Choose the Right Replacement: Select a compatible replacement battery for your Vivint Doorbell Camera. Refer to the camera’s manual or Vivint’s specifications for the correct battery type.
- Insert New Battery: Slide the new battery into the compartment, following the correct orientation. Make sure it securely fits to guarantee a reliable power source.
- Power On and Test: Turn on your Vivint Doorbell Camera and conduct a quick test to ensure the new battery is functioning correctly. This step ensures your camera is ready to capture every moment without interruptions.
How to Replace Vivint Doorbell With Ring?
Upgrading your doorbell to a Ring device from Vivint? I’ve got a simple guide to make the transition seamless. As a tech enthusiast, I’ll walk you through the steps to replace your Vivint doorbell with a Ring device effortlessly.
- Power Off Vivint Doorbell: Begin by turning off the power to your Vivint doorbell to ensure a safe removal process and avoid any electrical hazards.
- Remove Vivint Doorbell: Carefully detach the Vivint doorbell from its mounting bracket, following the manufacturer’s instructions for a secure and damage-free removal.
- Install Ring Doorbell: Mount your Ring doorbell on the existing bracket or follow the provided instructions for a new installation. Ensure a stable and level placement.
- Connect Wiring: Connect the wiring to your Ring doorbell, making sure to match the corresponding terminals. This step ensures proper functionality and power supply.
- Set Up Ring App: Download the Ring app, follow the on-screen instructions to set up your new device, and enjoy enhanced security features seamlessly.
How to Connect Vivint Doorbell Camera to WiFi?
Connecting your Vivint Doorbell Camera to WiFi is a crucial step for seamless smart home functionality. As a tech enthusiast, let me guide you through the straightforward process for a hassle-free connection.
- Power On Camera: Ensure your Vivint Doorbell Camera is powered on. Plug it in or insert a fully charged battery, depending on your device’s power source.
- Access Settings in Vivint App: Open the Vivint app and navigate to the camera settings. Look for the option to connect to WiFi, usually found in the device settings or network configuration.
- Select WiFi Network: Choose your WiFi network from the available list and enter the required credentials (SSID and password) to establish a secure connection.
- Wait for Confirmation: Allow the Vivint Doorbell Camera a moment to connect to the WiFi network. Once successfully connected, you should receive a confirmation message or indicator.
- Test Connectivity: Conduct a quick test by accessing the camera’s live feed through the app. Ensure a stable connection for optimal performance in monitoring your surroundings.
How Do I Fix My Vivint Camera Offline?
Dealing with a Vivint camera that’s gone offline? No worries—I’ve got a handy guide to troubleshoot and bring it back online. With my tech-savvy tips, you’ll have your Vivint camera up and running smoothly in no time.
- Check Power Source: Ensure your Vivint camera has a stable power supply. Confirm that the device is properly plugged in or that the battery is adequately charged.
- Verify WiFi Connection: Make sure your camera is connected to the WiFi network. Access the camera settings in the Vivint app and re-enter WiFi credentials if necessary.
- Reboot the Camera: Power cycle your Vivint camera by turning it off and on again. This simple step often resolves connectivity issues and restores the camera’s functionality.
- Examine Network Strength: Assess your WiFi signal strength at the camera’s location. Weak signals can cause disruptions, so consider relocating the camera or boosting your WiFi coverage.
- Update Firmware: Check for any available firmware updates for your Vivint camera. Updating to the latest version can address bugs and improve overall performance, potentially resolving the offline issue.
How to Remove Vivint Camera?
Ready to part ways with your Vivint camera? I’ll guide you through the simple steps to ensure a smooth removal process. As someone experienced in smart home tech, trust me—it’s easier than you think.
- Power Down the Camera: Begin by turning off the power to your Vivint camera. If it’s battery-powered, make sure to remove the batteries to guarantee a safe uninstallation.
- Detach Mounting Bracket: Carefully detach the camera from its mounting bracket. Follow the manufacturer’s instructions to avoid any damage during the removal process.
- Disconnect Cables: If your camera is wired, gently disconnect the cables, ensuring you note their placement for hassle-free reinstallation or replacement.
- Remove from Vivint Account: Access your Vivint app or account and remove the camera from your device list. This step ensures a clean break and prevents any lingering connections.
- Reset to Factory Settings (Optional): For an extra layer of security, consider resetting the camera to factory settings. Check the user manual for instructions on how to perform a reset, erasing any personal data stored on the device.
Wrap Up
Removing the Vivint doorbell has been a straightforward process, thanks to my hands-on experience with smart home devices. Trust me, it’s a breeze once you follow the steps.
My expertise assures you a smooth uninstallation, leaving you confident and ready for whatever comes next in your tech journey.
Don’t hesitate – dive in, follow the simple instructions, and bid farewell to your Vivint doorbell with ease. Your tech-savvy endeavors just got a whole lot simpler, and I’m here to ensure it stays that way.
Frequently Asked Questions
How do I turn off the power to remove my Vivint doorbell camera?
To turn off the power, locate your circuit breaker and switch off the breaker labeled for your doorbell. This ensures safety from electrical shock while working with the device.
What tools are needed to remove a Vivint doorbell camera?
You’ll need a Phillips-head screwdriver, wire strippers, and possibly a drill. These tools help loosen screws, strip wires safely, and remove any anchors used for mounting.
How do I disconnect the wiring from the Vivint doorbell camera?
After unscrewing the camera, carefully expose the wires and disconnect them using wire strippers. Be sure to label the wires for easier reinstallation if necessary.
What should I do with the mounting bracket after removing the Vivint doorbell camera?
After removing the camera, unscrew and remove the mounting bracket from the wall. Patch any holes left behind to restore the surface.
References:
Vivint.com. Doorbell Camera Pro – Remove and Install Replacement. https://support.vivint.com/article/Doorbell-Camera-Pro-S-Remove-and-Install
